





Quick Steps
- In Shopify, go to Apps > Printful and click Add product.
- Pick a product and choose Embroidery or DTG printing.
- Choose colors and sizes, then upload and place your design.
- Choose your mockups, edit the title and description, and set your retail prices.
- Click Submit to store.
Why Create Print on Demand Products with Printful
Creating print on demand products for your Shopify store is easy to do, and it can be a lot of fun playing around with different designs. With the Printful app, you design the product in Printful and it gets pushed to your Shopify store, mockups and all. In the video, DigitalGrl makes a sweatshirt two ways: once with a printed graphic and once with embroidery.
- Lots of products to choose from: Browse by category or collection, or search for something specific.
- See it before you sell it: Preview your design on every color you offer, so you only sell the ones where it looks good.
- Ready made mockups: Pick mockup images in different styles for your product page.
- Reuse your settings: Duplicate a product to start the next one with the same settings.
Haven’t connected Printful yet? Start with how to connect Printful to your Shopify store.
How to Create a Printful Product for Shopify
The video was recorded in 2022, so the Printful and Shopify screens may look a little different today.
Step 1: Open Printful from Shopify
- In your Shopify admin, click on Apps in the left-hand menu.
- Click on the Printful app. It takes you to your Printful account (sign in if you need to).
- Click the Add product button.
Step 2: Choose a Product
By default you’ll see the products Printful has recently introduced. You can browse by category on the left-hand side (for example Men’s clothing > T-shirts), browse the collections, or use the search field if you have something in mind.
Before you pick, compare a few things between similar products:
- Colors: How many colors are offered.
- Sizes: For example, one sweatshirt in the video goes from small to 3XL and another to 5XL.
- Where it ships from: Some products ship from Canada and the United States, others from the US only. If most of your customers live outside the US, that’s worth keeping in mind.
Once you’ve chosen your product, click on it.
Step 3: Choose Embroidery or DTG Printing
Embroidery is great for smaller images or graphics. Printing is great for larger graphics that cover more of the material. Look at the placement options at the top: some spots, like the center chest, are embroidery only, and others, like the outside label, are printing only.
Step 4: Pick Colors and Sizes
Select all of the colors you’d like to offer, or just a few. Then unselect any sizes you don’t want to include. The colors you choose appear across the bottom so you can see what the product will look like.
Step 5: Add Your Design
- Click Upload new file, browse your computer and upload your graphic. Already uploaded it before? Search your Printful library by file name instead.
- Hover over the file and click Apply.
- Turn the grid on to make sure your design stays within the print area, then resize and reposition it. Turn the grid off to see how it looks.
- Click through the colors at the bottom. If your design is hard to read on a color, click the X to remove that color.
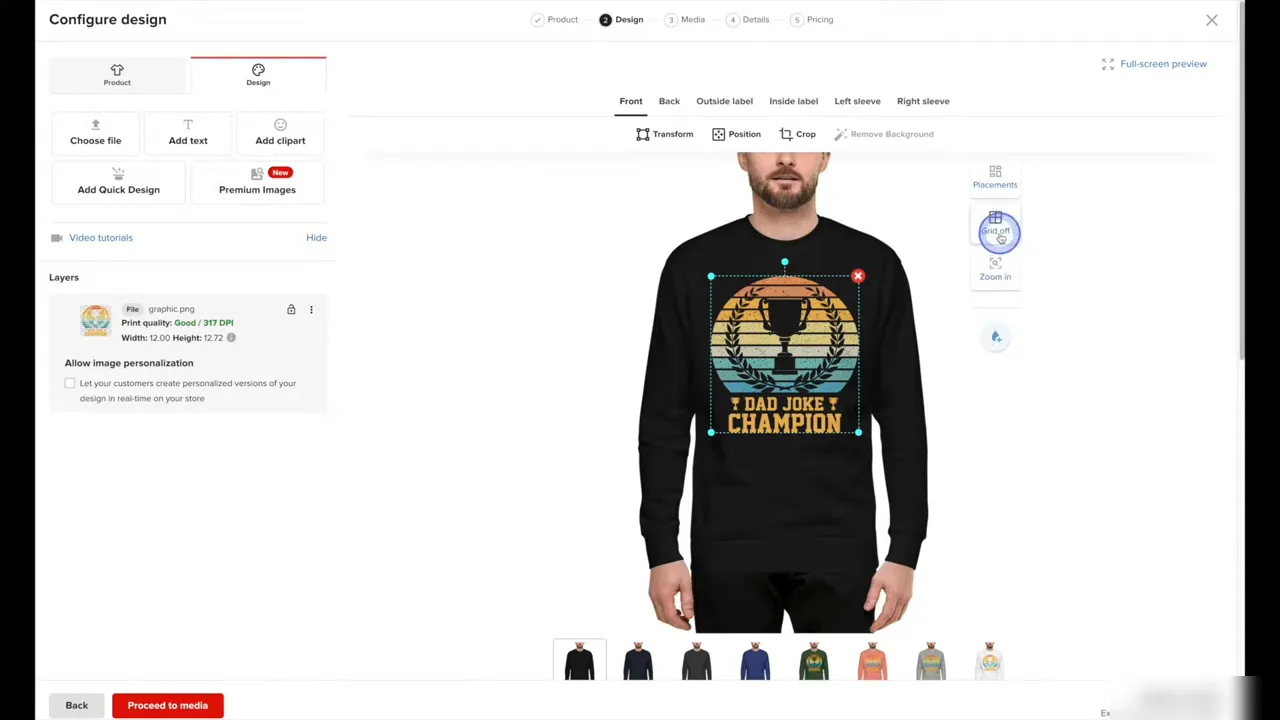
You can also add designs to other spots, like the back, the inside and outside labels and the sleeves.
Step 6: Choose Your Mockups
Click the button to proceed to Media. Pick a mockup style on the left, like a flat lay, and use the additional tab to add more mockup pictures. You can also add a product video. Keep in mind it shows the product itself, not your design.
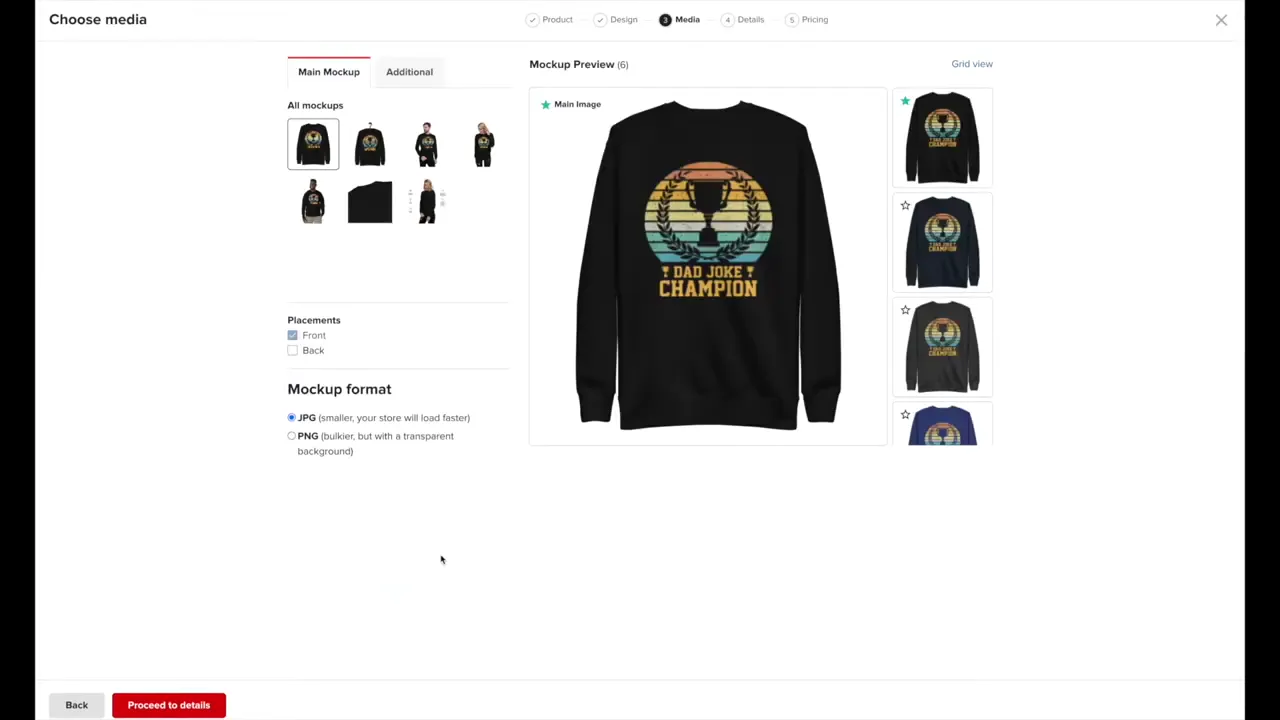
Step 7: Edit the Details
- Title and description: Printful gives you a default title and description. Use as much or as little of it as you like.
- Size guide: Add one if you wish and select the measurement system. Since customers can’t try on the item before they buy, a size guide is really useful.
- Tags: Optional, but they help organize the products in your Shopify store.
- Publish: Leave the option checked to publish the product right away.
Step 8: Set Your Retail Price and Submit
On the pricing step, update the retail price for each size by hand, or set the same revenue for all of them and let Printful adjust the retail prices. You can also save some settings for future products, like always including a size guide. When you’re done, click Submit to store. This pushes the product live to your Shopify store, with the mockups, colors and sizes you chose.
Step 9: Make Your Next Product Faster
Back in Printful, you can click Add product for a brand new product, or click the three dots on an existing product and choose Duplicate to keep the same settings. In the video, the duplicate is switched to Embroidery on the left chest:
- Delete the old graphic and choose your embroidery placement.
- Click Choose file and pick your image.
- Choose a thread color. Printful picks the closest match to your image by default, and you can change it.
- Resize and move the design, check it on each color, then continue to the mockups, details and pricing and click Submit to store.
Step 10: Fine Tune the Product in Shopify
Click Edit in Shopify to open the product in your Shopify admin. From there you can add more details, drag the mockup images into a different order or select images and click Delete files. Click Preview to see the finished product page.
Frequently Asked Questions
Embroidery is great for smaller images or graphics. Printing is better for larger graphics that cover more of the material. Some placements only allow one or the other.
After placing your design, click through the colors across the bottom of the editor. Remove any color where the design is hard to read.
Yes. Click the three dots on the product in Printful and choose Duplicate. The copy keeps the same settings, and you can change the design or technique.
Yes. Click Edit in Shopify to open it in your Shopify admin, where you can add details, reorder mockup images or delete images.
For more tutorials, visit our Printful Tutorials page or subscribe to our YouTube channel. You can also signup for our email newsletter below for free resources and the latest tutorials!